Table des matières
Open clinica
La recherche open-source
Voici comment se procurer, installer et configurer OpenClinica et ses dépendances logicielles.
Pré-requis
-
Avoir installé les paquets vim unzip tar
Installez Java JDK (Java Development Kit)
OpenClinica est écrit en Java.
Dans tout ce qui suit, remplacez v ou v.x.y par la version
installez le paquet openjdk-v-jdk
ou en ligne de commande ( en vous aidant de l’auto-complétion par la touche Tab ⇆) :
-
sudo apt-get update
sudo apt-get upgrade
sudo apt-get install openjdk-v-jdk
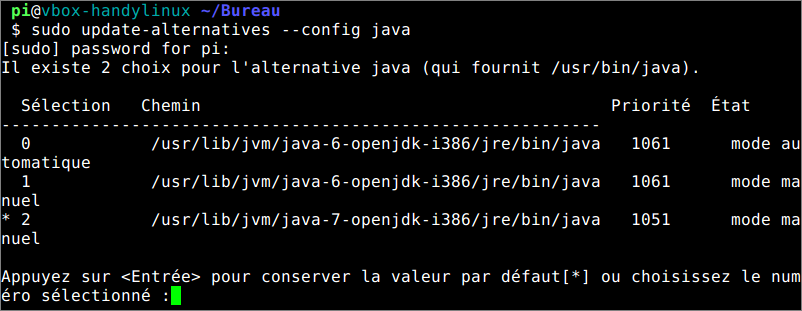
Pour retrouver l'emplacement de java, faire :
-
sudo update-alternatives --config java
Créez un lien symbolique vers l'emplacement repéré :
-
sudo ln -s /usr/lib/jvm/java-7-openjdk-i386* /usr/local/java
Vous pouvez vérifier par :
-
ll /usr/local
Vous pouvez aussi télécharger le jdk (version 6) sur le site de OpenClinica :
Allez au répertoire /[DISQUE]/oc/install :
-
cd /[DISQUE]/oc/install
Puis téléchargez jdk :
-
systèmes d'exploitation 32 bits :
wget http://svn.akazaresearch.com/oc/software/OpenClinica-3.1/linux/jdk-6u24-linux-i586.bin
-
systèmes d'exploitation 64 bits :
wget http://svn.akazaresearch.com/oc/software/OpenClinica-3.1/linux/jdk-6u24-linux-x64.bin
Installez Java en exécutant :
-
sudo chmod a+x jdk-6*
sudo ./jdk-6*
Une fois les fichiers extraits, le système affiche « Appuyez sur Entrée pour continuer … ». Appuyez sur ↵ Entrée.
Une fenêtre de navigateur s'ouvre, vous proposant d'enregistrer le logiciel Java. Inscrivez-vous ou fermez la fenêtre.
Installez Java en exécutant :
-
sudo mv jdk1* /usr/local/
sudo ln -s /usr/local/jdk1* /usr/local/java
Java est maintenant installé au bon endroit.
Installez Tomcat (Apache Tomcat Servlet Container)
Voir la page tomcat
Vous pouvez aussi télécharger Tomcat sur le site de OpenClinica :
Allez au répertoire /[DISQUE]/oc/install :
-
cd /[DISQUE]/oc/install
Puis téléchargez tomcat :
-
wget http://svn.akazaresearch.com/oc/software/OpenClinica-3.1/linux/apache-tomcat-6.0.32.tar.gz
Déplacez les applications Web fournies avec Tomcat et qui sont inutiles pour OpenClinica vers un autre emplacement :
-
sudo mkdir /usr/local/tomcat/oldwebapps
sudo mv /usr/local/tomcat/webapps/* /usr/local/tomcat/oldwebapps
Installez la base de données PostgreSQL et de l'interface web PhpPgAdmin
Voir Installation
Vous pouvez aussi télécharger PostgreSQL sur le site de OpenClinica.
Allez au répertoire /[DISQUE]/oc/install :
-
cd /[DISQUE]/oc/install
Téléchargez PostgreSQL :
-
systèmes d'exploitation 32 bits :
wget http://svn.akazaresearch.com/oc/software/OpenClinica-3.1/linux/postgresql-8.4.1-1-linux.bin
-
systèmes d'exploitation 64 bits :
wget http://svn.akazaresearch.com/oc/software/OpenClinica-3.1/linux/postgresql-8.4.1-1-linux-x64.bin
Installation (Linux)
Voir : https://docs.openclinica.com/3.1/installation/installation-linux
Téléchargez les fichiers d'installation
Vous pouvez télécharger une copie des installateurs pour Java, Tomcat et PostgreSQL sur le site OpenClinica.
Dans les instructions, remplacez v.x ou v.x.y par le numéro de version (par exemple 1.2.3).
Il y a des éditions 32 bits et 64 bits. Pour déterminer si votre système est en 32 bits ou 64-bit, exécutez dans votre terminal :
-
sudo uname -a
L'affichage indique la version :
-
i386 ou i686 → 32 bits
-
x86_64 → 64 bits.
Créez un répertoire de travail sur un disque (/media/… ou /home/user … Nous l'appellerons /[DISQUE] et faites-en le répertoire courant en exécutant les commandes suivantes :
-
mkdir -p /[DISQUE]/oc/install
cd /[DISQUE]/oc/install
Installation de OpenClinica
Téléchargez le logiciel OpenClinica sur le site https://community.openclinica.com/project/openclinica.
Pour télécharger OpenClinica, vous devez avoir un compte utilisateur de la communauté OpenClinica (inscription gratuite) et vous connecter à ce compte.
Après avoir téléchargé OpenClinica, déplacez-le vers le répertoire où vous avez téléchargé les autres composants logiciels (/[DISQUE]/oc/install):
-
/[DISQUE]/oc/install
Configuration
Configuration de Java
Renseigner la variable JAVA_HOME :
-
export JAVA_HOME=/usr/local/java
Pour rendre cela permanent, Ouvrir avec les droits d'administration le fichier ~/.bash_aliases pour y ajouter la ligne :
- ~/.bash_aliases
...
export JAVA_HOME='/usr/local/java'
Configuration de phpPgAdmin
Voir Configuration
Configuration de lighttpd
Dans le fichier /etc/lighttpd/lighttpd.conf, assurez-vous que le module mod_alias est dé-commenté (donc activé)
Lancez la commande :
-
sudo lighty-enable-mod
et vérifier que les modules fastcgi et cgi sont activés. Sinon, activer ceux qui manquent.
Redémarrez le serveur :
-
sudo service lighttpd restart
Connexion à tomcat depuis lighttpd
Nous allons utiliser mod_proxy pour nous connecter à Tomcat.
Lighty, jre et apache-tomcat sont en place.
Avant tout, configurez JAVA_HOME et ajoutez JAVA_HOME/bin au path. Ouvrez /etc/profile et ajoutez ce qui suit avant la commande export :
- /etc/profile
JAVA_HOME="/usr/local/jre1.6.0_01/"
export JAVA_HOME
PATH=$JAVA_HOME/bin:$PATH
Pour que cette modification prenne effet, déconnectez-vous et reconnectez-vous. Vérifiez que JAVA_HOME est définie :
-
echo $JAVA_HOME
/usr/local/jre1.6.0_01/
Essayez de démarrer Tomcat (inutile de régler CATALINA_HOME parce que Tomcat le trouve tout seul :
-
/usr/local/apache-tomcat-v.x.y/bin/startup.sh
Using CATALINA_BASE:   /usr/local/apache-tomcat-6.0.10
Using CATALINA_HOME:   /usr/local/apache-tomcat-6.0.10
Using CATALINA_TMPDIR: /usr/local/apache-tomcat-6.0.10/temp
Using JRE_HOME:       /usr/local/jre1.6.0_01/
Essayez de vous connecter au serveur sur le port 8080 → vous devriez voir la page par défaut de Tomcat.
Maintenant, ajoutez un utilisateur à $CATALINA_HOME/conf/tomcat-users.xml :
- $CATALINA_HOME/conf/tomcat-users.xml
<role rolename="manager"/>
<user username="tomcat" password="password" roles="manager"/>
Redémarrez Tomcat pour que les modifications prennent effet :
-
sudo /usr/local/apache-tomcat-6.0.10/bin/startup.sh
sudo /usr/local/apache-tomcat-6.0.10/bin/shutdown.sh
Tomcat est prêt ; il est temps de configurer lighttpd. Ouvrez /etc/lighttpd/lighttpd.conf et activer mod_proxy en le dé-commentant :
server.modules = ( # “mod_rewrite”, # “mod_redirect”, # “mod_alias”,
"mod_access",
# “mod_cml”, # “mod_trigger_b4_dl”, # “mod_auth”, # “mod_status”, # “mod_setenv”, # “mod_fastcgi”,
"mod_proxy",
# “mod_simple_vhost”, # “mod_evhost”, # “mod_userdir”, # “mod_cgi”, # “mod_compress”, # “mod_ssi”, # “mod_usertrack”, # “mod_expire”, # “mod_secdownload”, # “mod_rrdtool”,
"mod_accesslog" )
Ajouter à la fin du fichier de configuration ce qui suit, en adaptant :
$HTTP[“host”] =~ “10.10.10.56” {
  proxy.server = (
      "" => (
          "tomcat" => (
              "host" => "127.0.0.1",
              "port" => 8080,
              "fix-redirects" => 1
          )
      )
  )
}
Remplacez l'adresse IP par un nom d'hôte ou l'adresse IP de votre serveur.
Cette directive proxy connecte lighttpd à Tomcat sur le localhost sur le port 8080 quand la demande arrive sur le port 80 pour lighttpd sur l'IP 10.10.10.56.
Lancez lighttpd et essayez !
-
sudo /etc/init.d/lighttpd start
Configuration de la base de données pour OpenClinica
Graphiquement, avec phppgadmin
Ouvrez la page de phppgadmin : http://domaine.tld/phppgadmin/
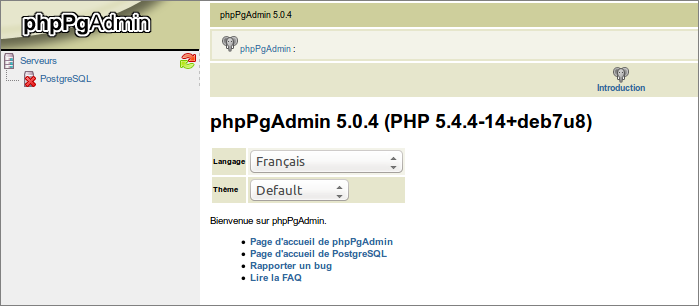
Choisissez la langue (français)
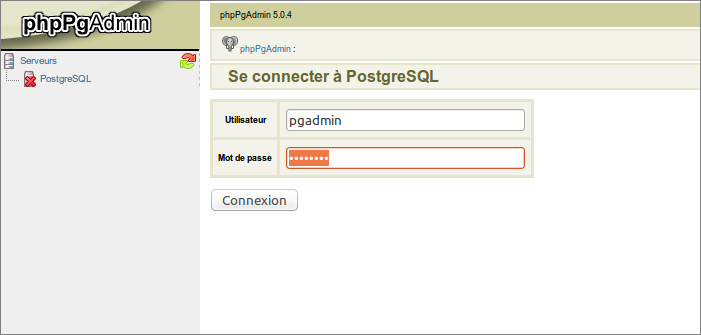
Dans la colonne de gauche, cliquez sur PostgreSQL. Il apparaît un formulaire de connexion :
Connectez-vous avec le rôle pgadmin créé plus haut.
Nous allons créer un nouveau compte d'utilisateur pour openclinica
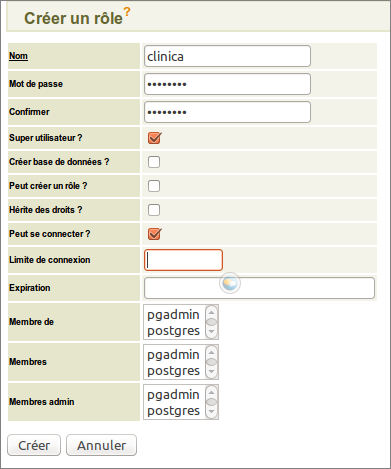
Cliquez sur le bouton Rôles dans la zone du milieu en haut de la page puis, en bas, sur le lien “Créer un rôle” :
-
Nom : clinica
-
donner un mot de passe en le confirmant
-
cochez
-
Super utilisateur
-
et Peut se connecter
Ne cochez pas :-
Créer base de données
-
Peut créer un rôle
-
Hérite des droits
Ignorez les autres optionsCliquez sur CréerCliquez sur Déconnexion en haut à droite de la pageDéconnectez-vous (en haut à droite de la page) et reconnectez-vous (en cliquant à gauche sur PostgreSQL) sous l'utilisateur clinica.
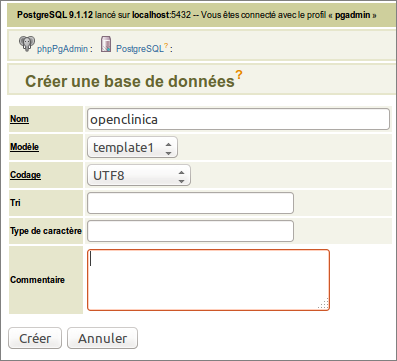
Cliquez sur le bouton Bases de données en haut puis, en bas, sur le lien “Créer une base de données” :
-
Nom : openclinica
-
Codage : UTF8
Cliquez sur le bouton Créer.
En ligne de commande
On utilise psql sous postgres (n'oubliez pas les point-virgules en bout de ligne !) :
-
sudo -u postgres psql
Exécutez les commandes suivantes pour créer l'utilisateur clinica (que OpenClinica utilise pour se connecter à la base de données) avec un mot de passe sécurisé et la base de données openclinica :
-
create role clinica login encrypted password 'XXXXXXXX' superuser noinherit nocreatedb nocreaterole;
create database openclinica with encoding='UTF8' owner=clinica;
Et quittez psql :
-
\q
Déploiement d'OpenClinica dans Tomcat
Allez dans le répertoire webapps de tomcat et copiez-y le fichier .war d'Openclinica.
-
cd /usr/local/tomcat/webapps
sudo cp /[DISQUE]/oc/OpenClinica.war .
Tomcat déploie automatiquement le fichier .war d'OpenClinica en créant un répertoire webapps/openclinica et qui peut être utilisé avec la base de données.
Utilisation
Lancez l'application via le dash (Ubuntu 11.04 et ultérieures) ou via le terminal (toutes versions d'Ubuntu) avec la commande suivante :
machin-chose
Désinstallation
Pour supprimer cette application, il suffit de supprimer son paquet. Selon la méthode choisie, la configuration globale de l'application est conservée ou supprimée. Les journaux du système, et les fichiers de préférence des utilisateurs dans leurs dossiers personnels sont toujours conservés.
Voir aussi
Essais FNF : Open clinica sur Raspberry pi
Contributeurs principaux : votre nom ou pseudonyme, nom ou pseudo autre.
Basé sur « Titre original de l'article » par Auteur Original.
- Réglez Tomcat pour démarrer
Vous pouvez configurer Tomcat pour qu'il démarre automatiquement lorsque vous démarrez votre système.
Pour que Tomcat démarre automatiquement au démarrage du système, exécutez la commande suivante (cas de RedHat) :
-
sudo cp /usr/local/oc/install/OpenClinica-v.x*/install-docs/linux/tomcat /etc/init.d/
cd /etc/init.d
sudo chmod a+x /etc/init.d/tomcat
Ajoutez ce script au démarrage :
-
sudo update-rc.d tomcat defaults
pour le retirer :
-
le retirer de /etc/init.d
-
sudo update-rc.d tomcat remove
Pour arrêter et démarrer Tomcat manuellement :
-
pour arrêter
/usr/local/tomcat/bin/shutdown.sh
-
pour démarrer
/usr/local/tomcat/bin/startup.sh
- Configurez OpenClinica pour une performance optimale
Modifiez init.d/tomcat et remplacer les JAVA_OPTS avec ce qui suit:
-
export JAVA_OPTS="$JAVA_OPTS -Xmx1280m -XX:+UseParallelGC -XX:ParallelGCThreads=n -XX:MaxPermSize=180m -XX:+CMSClassUnloadingEnabled"
- XX:ParallelGCThreads=n
- n = nombre de cœurs de votre processeur (< 8).
Le nombre de coeurs peut être déterminé en utilisant la commande top
Notez qu'il faut au minimum 1280 Mo de RAM avec ces paramètres. La quantité de mémoire disponible peut être déterminée à l'aide de la commande
free-m
qui donne la mémoire en Mo.
La valeur de MaxPermSize dépend du nombre de fichiers war que vous déployez. Le fichier war web nécessite PermGen=180m ; le war ws nécessite PermGen=90m.
Pour que les paramètres prennent effet, redémarrez le serveur Tomcat.
- Configurez l'application OpenClinica
Si vous avez suivi toutes les instructions précédentes, il n'y a qu'une propriété dans le fichier de configuration, datainfo.properties, que vous devrez peut-être changer pour démarrer OpenClinica.
Il ya d'autres propriétés dans le fichier de configuration que vous voudrez probablement modifier.
Ouvrir avec les droits d'administration le fichier /usr/local/tomcat/webapps/OpenClinica/WEB-INF/classes/datainfo.properties pour le modifier comme ceci :
Vous devez modifier la valeur de dbPass pour le mot de passe que vous avez sélectionné à la configuration de la base de données PostgreSQL. Modifiez les valeurs pour les autres propriétés, puis enregistrez le fichier.
Mettre à jour le paramètre filePath
Exécutez les commandes suivantes :
-
sudo chown -R tomcat /usr/local/tomcat/*
sudo chown -R tomcat /usr/local/apache-*
Vous pouvez aussi configurer OpenClinica pour l'internationalisation si vous souhaitez utiliser OpenClinica dans différentes langues.
Si vous avez besoin d'utiliser des caractères UTF-8 dans votre application, vous devrez peut-être modifier la configuration de votre connecteur par défaut.
Pour plus d'informations concernant la configuration OpenClinica pour l'internationalisation et l'utilisation de caractères UTF-8, voir https://docs.openclinica.com/3.1/technical-documents/openclinica-and-internationalization
- Description des datainfo.properties fichier
Le fichier datainfo.properties ressemble à ce qui suit.
Chaque groupe de propriétés est numérotée et précédée par des lignes de commentaire décrivant le groupe de propriétés.
- datainfo.properties
#############################################################################
# 1 - Database Configuration
#
# Database configuration is done with the following 6 properties
# The dbType options are either postgres or oracle.
# Enter the user name and password to access the database in
# dbUser and dbPass.
# The db field is for the name of the database and provide the port
# in dbPort.
# dbHost can be a URL, IP address or localhost
#
# REQUIRED
#############################################################################
dbType=postgres
dbUser=clinica
dbPass=clinica
db=${WEBAPP.lower}
dbPort=5432
dbHost=localhost

#############################################################################
# 2 - filePath
#
# File Path is the string which declares the
# repository for all uploaded and generated
# files in the system, including CRFs and
# data sets.  The directory should NOT be
# accessible by the web server.
#
# REQUIRED.
#############################################################################
filePath=${catalina.home}/${WEBAPP.lower}.data/

#############################################################################
# 3 - Attached File Location
# Location for files if item data type is "file". If it has been kept empty,
# "filePath" will be used as the attached file location.
# This will be a sub folder within the filePath location only.
# You may configure a full path that points to a directory outside of the filePath.
# If you configure a full path, it must have a trailing slash.
# Example = /usr/local/attached_file/ or C:\\attached_file\\
#
# NOT REQUIRED
#############################################################################
# attached_file_location=

#############################################################################
# 4 - user_account_notification
#
# User Account Notification is the method by
# which new users are sent their passwords.
# Users can be sent passwords via email,
# or the password can be displayed on the screen
# to the administrator, who is instructed to
# write it down and physically give it to the user
# in question.  The default is email.
#
# REQUIRED.
#############################################################################
userAccountNotification=email

#############################################################################
# 5 - adminEmail
#
# The Admin Email is the field to set the administrator's
# email for a given server. It is also used for
# replies to the email messages sent by the system.
#
# REQUIRED
#############################################################################
adminEmail=admin@example.com

#############################################################################
# 6- Spring Based Email System
#
# Configure the Email SMTP host below. If the host
# requires a username and password make sure
# mail.smtp(s).auth is set to true.
# Configure mail protocol via mail.protocol, Valid options
# would be smtp or smtps.
# Configure smtp over ttls by setting mail.smtp(s).starttls.enable
# to true.
# Configure connection timeout. Preconfigred to 5 secs
#############################################################################
mailHost=mail.smtp.com
mailPort=25
mailProtocol=smtp
mailUsername=
mailPassword=
mailSmtpAuth=false
mailSmtpStarttls.enable=false
mailSmtpsAuth=false
mailSmtpsStarttls.enable=false
mailSmtpConnectionTimeout=100
mailErrorMsg=developers@openclinica.org

##############################################################################
#
#        This property will be removed starting from 3.1.3

#
# 7 - passwd_expiration
#
# Passwd Expiration Time is the number of
# days that can elapse before a user is notified that
# they should change their password.
#
# REQUIRED.
#############################################################################
passwdExpirationTime=360

#############################################################################
# 8 - sysURL
#
# The web address for the system.  It can either be an external
# address (demo.openclinica.org) or an internal IP
# address (192.168.2.000).
# NOTE: If you reconfigure the address or port in some later
# step, such as by configuring SSL, you will need to come back
# and update this file. You will also need to restart tomcat
# for changes to this take effect.
#
# REQUIRED
#############################################################################
sysURL=http://192.168.2.000:8080/${WEBAPP}/MainMenu

#############################################################################
# 9 - max_inactive_interval
#
# This is maximum time interval between client requests. That is,
# if users leave any page open without sending a request to the
# server, after this time interval, when users attempt sending
# request they will be directed to login page.
#
# REQUIRED
#############################################################################
maxInactiveInterval=3600

#############################################################################
#
#        This property will be removed starting from 3.1.3

# 10- change_passwd_required
# Change Passwd Required is a flag which will force users to change
# their password when they log on for the first time or when their
# time expires. 1 is for required, 0 is for not required.
#
# REQUIRED.
#############################################################################
change_passwd_required=1

#############################################################################
# 11 - Logging configuration

# SysLog support has been fully implemented in OpenClinica, but by default has been turned off.
# Every piece of code that could send information to the syslog server has not been reviewed
# and cleaned to ensure it is entirely readable and useful.  This will be an ongoing effort
# and resolved in a future release.  Please use the SysLog support at your own risk.
#
# Specify the log location - local/syslog/both
#
log.dir=${catalina.home}/logs/openclinica
logLocation = local
#
# Specify logging level - trace/debug/info/warn/error
logLevel = info
syslog.host = localhost
syslog.port = 514

#############################################################################
# 12- News/About
# On the OpenClinica login screen, there will be a box to the right of the login section
# which can contain an RSS feed.  You can configure what RSS feed is used in the rss.rl field.
# If you do not want the RSS feed, please comment out rss.url and rss.more and uncomment
# about.text1 and about.text2.  These two fields can be used for any free form text that you
# you want to appear on the OpenClinica login page.
# the default feed is http://clinicalresearch.wordpress.com/feed/
# default value for rss.more http://clinicalresearch.wordpress.com/
#############################################################################
# rssUrl=http://clinicalresearch.wordpress.com/feed/
# rssMore=http://clinicalresearch.wordpress.com/
# about.text1= Hello World 1
# about.text2= Hello World 2

#############################################################################
# 13 - CRF File Upload Configuration
# crf.file.extensionSettings can have 3 values valid,invalid or left empty which defaults to valid.
# if crf.file.extensionSetting= valid , then extensions specified can be uploaded.
# if crf.file.extensionSetting= invalid , then extensions specified can NOT be uploaded.
# if crf.file.extensions is left empty and crf.file.extensionSettings=valid then all extensions are valid
# if crf.file.extensions is left empty and crf.file.extensionSettings=invalid then all extensions are NOT valid
# separate extensions with a comma and do not include the leading dot.
#############################################################################
# crfFileExtensions=
# crfFileExtensionSettings=

#############################################################################
# 14 - supportURL
#
# The Support URL is included in the support button that appears
# in the top right corner of all pages in OPenClinica. By including
# the URL here we will be able to configure it depending on the adopter
#
# REQUIRED
#############################################################################
# supportURL=https://www.openclinica.com/OpenClinica/3.1/support/

#############################################################################
# 15- Quartz Scheduler Configuration
#
# Configure the mis-fire threshold for the scheduler,
# and the number of extract jobs can run at a single time.
#
# REQUIRED
#############################################################################
org.quartz.jobStore.misfireThreshold=18000000
org.quartz.threadPool.threadCount=1
org.quartz.threadPool.threadPriority=5

#############################################################################
# 16 - CCTS configuration
#
# This is used for OpenClinica instances that have been modified and configured
# to work with the Cancer Clinical Trials Suites.  This is a caBIG suite of applications.
# The configuration determines how long OpenClinica will hold a transaction from C3PR
# and will wait for a roll back message before committing it to the database.
#
# NOT REQUIRED
#############################################################################
ccts.waitBeforeCommit=6000

#############################################################################
# 17 - Facility information
#
# The OpenClinica defaults will be used when creating a new study
# unless you uncomment each property and provide a value next to
# each = sign.
#
# NOT REQUIRED
#############################################################################
# FacName=
# FacCity=
# FacState=
# FacZIP=
# FacCountry=
# FacContactName=
# FacContactDegree=
# FacContactPhone=
# FacContactEmail=

#############################################################################
# 18 - export data file path
#
# Export Data File Path is the string which (optionally)
# declares a specific file path for file extracts to be
# saved.  This is a sub folder of filePath.
# Note that if it is set, files from Jobs only will be saved
# to two places: this directory and under the above file path
# declared in the 'filePath' property.
#
# NOT REQUIRED.  Please comment out if you want Jobs to generate
# one file/files only, in the directory structure under 'filePath'.
#############################################################################
# exportFilePath=scheduled_data_export
#############################################################################
# 19 - Usage statistics configuration
# Usage statistics refers to information automatically sent back to OpenClinica.org
# to help us figure out how well OpenClinica is working and help us improve it in
# future versions.
# This includes technical information such as the version of OpenClinica installed, the number of studies created and user load. These statistics DO NOT include information such as study or CRF names, study data, or user information. We collect this data in aggregate and use it according to our Privacy Policy [https://community.openclinica.com/privacy-policy] to improve our products and services.
#
# As part of system configuration, we give you the option to help us improve OpenClinica by sending these usage statistics. If you elect to send this information but later change your mind, you can disable this feature in the datainfo.properties file by changing
# 'collectStats' value to 'false'
collectStats=true
usage.stats.host=usage.openclinica.com
usage.stats.port=514
OpenClinica_version=${version}

#############################################################################
# 20 - Rule Designer configuration
# OpenClinica Enterprise customers are allowed access to a GUI based Rule Designer.
# This configuration allows the OpenClinica instance to contact the Rule Designer for
# access.  If you are not an OpenClinica Enterprise customer, your users will be re-directed
# to a landing page and will have to navigate back to their OpenClinica instance.
# If you do not want to see a link to the Rule Designer on the Build Study page,
# you must delete this configuration option.
#
# To become an OpenClinica Enterprise customer, please contact sales@openclinica.com
#############################################################################

designerURL=https://designer.openclinica.com/
- Vérifier l'accès à OpenClinica
À ce stade, Java, Tomcat, PostgreSQL et OpenClinica sont installés et mis en place.
Redémarrez le système en exécutant:
-
reboot
Après le démarrage du système, accédez à OpenClinica à l'adresse suivante : http://localhost:8080/OpenClinica
La page de connexion doit s'afficher.
Pour vérifier votre configuration, essayez d'accéder à OpenClinica depuis un autre ordinateur en exécutant la même commande à partir de cet ordinateur, mais remplacez localhost par l'IP ou le nom du serveur.
- Configurez Tomcat pour utiliser HTTPS
OpenClinica recommande vivement la sécurisation du serveur Tomcat en utilisant un protocole SSL. pour établir des connexions sécurisées https://. SSL nécessite un certificat de sécurité. Informations sur la configuration de certificats SSL pour Tomcat sur ce site : http://tomcat.apache.org/tomcat-6.0-doc/ssl-howto.html
- Vérification de l'installation
Connectez-vous à OpenClinica avec le nom d'utilisateur root et le mot de passe 12345678.
OpenClinica vous oblige à changer le mot de passe pour l'utilisateur “root” en un mot de passe sécurisé.
Par défaut, l'utilisateur “root” est affecté à l'étude “Default”.
Créez un compte d'utilisateur de connexion pour vous-même, avec :
-
type d'utilisateur : «administrateur technique»
-
rôle de l'utilisateur : Gestionnaire de données.
-
